Some people start preparing their rucksack a month in advance. Others do it the evening before, with the kit list open on their phone and everything spread out on the bed. Sooner or later, though, that moment comes for everyone: you look at the rucksack, you look at the list, and you wonder what really needs to go inside.
Boots. Crampons. Harness. Gloves. Down jacket. Sunglasses. Sun cream. Flask. Head torch. Sleeping liner.
That is what the list is for: to avoid forgetting things, to give order, and to help you check that the essential equipment is there. We send it when you book, we go back to it in the messages before departure, and we repeat it more than once because arriving prepared matters in high mountains.
This time, though, we want to take a slightly different step.
We do not simply want to tell you what to buy. We already have detailed articles on our blog with full lists divided by activity.
Here we want to help you do something more important: read a kit list with your head switched on.
Because a Monte Rosa equipment list is not a blind instruction. It is a set of materials that may be needed in high mountains. Then there is you: your body, your experience, the way you feel cold, heat, wind, the discomfort of a boot, the confidence of wearing a layer you have used for years.
You may already have part of the equipment at home. It may be perfectly fine. It may simply need checking, testing before departure or combining better with your other layers.
In a world that constantly pushes us to buy something new, keeping and reusing good equipment is almost a luxury. We like that. In the mountains, it also makes sense: equipment has to work, protect you and allow you to move well. The logo, the latest model and the price matter far less.
In brief
A kit list helps you avoid forgetting things, but it needs to be understood. Before buying, check what you already have. Judge each item by function, not by brand. Test your boots, crampons and layers before departure. In high mountains, the right choice comes from suitable equipment, a clear head and questions asked in good time.
The list helps. Your head matters more
A list is a list. It tells you what to bring, but it cannot decide for you how to dress, when to add a layer, when to remove something, what to keep close at hand and what to leave inside the rucksack.
A list includes everything that may be useful at altitude. Then come the weather, the temperature, the wind, the height, the plan for the day and the way your own body reacts.
If you know your legs are always warm, you may not start already wearing thermal leggings under your trousers. If your ears get cold easily, you will choose a warmer hat or a headband that covers them well. If you sweat a lot under your arms, you will need to think carefully about your layers, because starting too warm and getting wet early can become a problem later on. If you wear prescription glasses or your eyes are very sensitive, you need to organise a solution that really protects you.
We guide you. We tell you what is needed, what characteristics your equipment should have and which mistakes to avoid. But only you really know your body. You know whether your feet get cold quickly, whether a glove bothers you, whether a boot creates pressure after two hours, whether a heavy hat makes you sweat.
That is why a Monte Rosa kit list should be read with responsibility. Never as an automatic checklist.
A question asked before departure is worth far more than a problem discovered in the hut, early in the morning, when the guide is preparing the rope team and everyone needs to be ready.
Before buying, look at what you already have
This point matters to us.
You do not need to buy all-new equipment for your first climb on Monte Rosa. Some items do need specific characteristics, of course. Boots, for example, must be ankle-high, waterproof, warm and have a stiff sole. Crampons must be compatible. Sunglasses must protect properly. Gloves must be suitable for the cold.
But there is a real difference between “suitable” and “new”.
Do you already have a good mountain or ski jacket that is windproof and waterproof? It may work. Do you have older boots that are still in good condition, warm, waterproof, ankle-high and compatible with crampons? They may be suitable, if you test and check them. Do you have category 3 sunglasses and you are doing your first climb in good conditions? They may be enough, as long as they protect well and you understand that glare on the glacier is strong.
If you want to buy boots for 400 or 700 euros, that is absolutely fine. If you know you will continue mountaineering, investing makes sense. But if this is your first experience, before filling your cellar with technical equipment you may only use once, stop for a moment. Look at what you have. Ask. Think.
Good equipment is equipment that works for what you need to do.
Layers: dressing so you can change your mind
When we talk about five layers for the upper body, we are not saying you have to wear them all at the same time from the start.
We are saying you need a system.
A base layer against the skin, a light layer, a warmer layer, a down jacket or warm jacket, and a windproof and waterproof shell. That is the idea. Then, during the day, you choose.
The technical base layer is the layer closest to your skin. It helps manage sweat, keeping you drier and warmer. It can be synthetic, merino wool, or simply a garment you already know you tolerate well. If you are allergic or sensitive to certain fibres, choose accordingly. Cotton is better avoided because it dries slowly, but even here common sense matters: if you have a garment you know, use well and trust, it is worth discussing.
A spare base layer is especially useful when you arrive at the hut sweaty or damp. Changing before you cool down can make a big difference. On a multi-day climb, it is a very practical detail. On a single-day climb it may be less central, but it remains useful if you sweat a lot or if the weather is uncertain.
A light fleece is the comfortable layer that often stays on while you walk. Over the base layer, it gives some warmth without becoming too much. It does not have to be a catalogue fleece. It can be a light technical top, a small technical jumper, or a layer you are used to. It needs to provide warmth, take up little space and allow you to move.
The warmer layer should be chosen according to the expected temperature and the way you feel the cold. If the early start is cold, if the wind is strong or if you are a person who feels the cold easily, you will really need it. If you already have a very warm jacket, you may organise the system differently. Here the list gives you a structure, then you have to assess your own system as a whole.
A light or medium down jacket is useful when you need to retain warmth without carrying unnecessary weight. It works well with the shell: the down jacket keeps you warm, the shell protects you from wind and moisture. The point is not to add heavy layers without logic. A light down jacket plus a shell makes sense. A light down jacket, a heavy shell and another wind jacket on top can become a confused system: too warm when you move and awkward when you need to add or remove something.
The windproof and waterproof shell is there to protect you. If you already have a mountain or ski jacket that does this job well, you do not necessarily need two garments doing the same thing. A layering system remains the most versatile option, because it allows you to adjust. But at the beginning, before buying thousands of euros’ worth of equipment, it makes sense to start from what you already have and check whether it really performs the function required.
The idea is simple: you dress to regulate your body, not to look like a mountaineer.
Trousers, thermal leggings and gaiters
Windproof mountaineering trousers are the most sensible choice for Monte Rosa. They allow you to walk on snow, move with crampons and a harness, protect yourself from the wind and remain comfortable for many hours.
If you already have older trousers that are warm and suitable for movement, you can assess them. You may add thermal leggings if it is cold. You may use gaiters if the lower part of the trousers is likely to get wet or if snow could enter your boots.
The problem is not having the perfect trousers from a catalogue. The problem is ending up with wet legs and feet at altitude.
If it is very cold, you need to be able to cover up. If it is warm, you can dress lighter. In any case, snow must not enter your boots and your feet must not get wet. A wet foot early in the morning or in low temperatures can turn a normal day into a much harder one.
Thermal leggings are useful, especially if you feel the cold or if the day is cold. They can also be useful in the hut, for sleeping or for comfort after the climb. If, on the other hand, your legs are always warm and you already have good technical trousers, they may stay at home or in the rucksack. They should not be treated as an absolute obligation. They should be considered.
Gaiters protect the lower leg and help prevent snow entering the boot. If the trousers already have a good internal gaiter, in some conditions that may be enough. If they do not, external gaiters become useful. It seems like a detail, until you find yourself with damp boots.
Socks: warm, comfortable and suited to the length of the climb
On kit lists you often find two pairs of technical socks. In simple terms, you need warm, comfortable socks suited to your boots and to the length of the climb.
If you are doing a single-day climb, one pair may be enough. If you are staying in a hut or following a multi-day programme, bring two. If a sock gets wet or you need to change, having a dry spare becomes very important.
Does wool not bother you? A good wool sock is absolutely fine. Do you prefer a synthetic technical sock? That is fine too. The important thing is that your foot stays warm, dry and free from pressure points.
The boots protect you from water. Gaiters help prevent snow entering from above. Socks complete the system.
Hat, buff and gloves: the extremities matter
Hands, feet, ears, nose. Every exposed part needs to be protected well.
A hat should never be missing. It must cover the ears, because at altitude they cool quickly. If your head gets hot easily, you can choose a warm headband that covers the ears properly. But the ears need protection. At minus 2, minus 5, minus 10 or in the wind, the cold arrives fast.
A buff or neck warmer is small, light and takes up very little space. That is why it is worth bringing one. If there is wind, you can pull it up over your face. It protects your nose, cheeks and neck, giving you a little extra margin without taking up space.
You need two pairs of gloves: one light pair and one warmer pair.
The light gloves are useful when walking and when you need dexterity. The warm gloves are needed when it is cold, when you stop, when the wind picks up or when your hands begin to lose feeling. There is also a very practical reason: if you lose one glove, being left without gloves at altitude is a serious problem. A second pair means having a plan B.
Sunglasses, ski goggles and sun protection
Sunglasses are essential. On the glacier, the snow reflects light and the glare is strong. Eyes must be protected before discomfort appears, not after.
Category 3 or 4 is recommended. If you are buying sunglasses specifically for high mountains, choose category 4 protection. If you already have good category 3 sunglasses and you are doing your first climb in normal conditions, they may be suitable, especially for a climb such as the classic route to Capanna Margherita, where you are not exposed for many consecutive days. The important thing is that they protect well, including from the side, and that you actually wear them.
If you wear prescription glasses or have specific needs, organise your solution before departure. Prescription lenses, clips, prescription sunglasses, contact lenses: everyone needs to find the safest and most comfortable option for themselves.
Ski goggles are useful in strong wind, snow, hail or if bad weather is expected for several hours. They protect the face and eyes better. If the forecast shows two days of stable weather and sun, they often remain unused in the rucksack. Again: the list includes them, then we assess the conditions.
Sun cream and lip protection should always be carried. Solar radiation is strong at altitude, and on snow it increases further. The fact that it feels cool does not mean the sun is less powerful. Having them in the rucksack only helps if you use them.
Boots: the point where you should not improvise
With boots, we need to be very clear.
They must be ankle-high, waterproof, warm and have a stiff sole. They must be compatible with crampons and already tested before the climb, with the socks you will actually use.
The stiff sole is needed because crampons have to be fitted to the boot. If the sole is too soft, the crampon works badly and may come off. The ankle support matters because you walk on snow, glacier and uneven ground: it supports the joint and helps prevent snow entering the boot. A wet foot in low temperatures is one of the worst things you can carry with you during a climb.
Waterproofing and warmth are just as important. A leather boot, for example, can still be suitable if it is well preserved, properly treated and compatible with crampons. If the front is no longer fully waterproof, you may consider gaiters. If you have modern, well-closed and waterproof boots, gaiters may not be necessary.
A new, stiff boot that has never been used can ruin a climb. An older boot that is comfortable, warm and already tested can be a sensible choice. It must be checked, of course. The soles must not be dry or damaged, the upper must hold, the laces must be in good condition, and the foot must remain stable without painful pressure points.
The brand matters less than the function. The right boot is the one that meets the requirements, keeps your foot warm and stable, works well with crampons and allows you to walk for hours.
Crampons and harness: real tools, not accessories
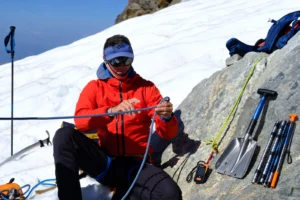
On the glacier, crampons are always needed. If you have your own, know them, they are compatible with your boots and you know how to adjust them, bring them. It is useful to use personal equipment that is already adapted to you.
If you do not have them, we provide them. We use universal Grivel crampons, a simple and deliberate choice: they are suitable for glacier travel, work with many mountaineering boots and allow clear adjustment even for those with little experience. You do not need the most sophisticated equipment; you need correct, solid, compatible equipment that is checked before departure.
The important thing is that the crampons are adjusted properly. They must stay firm, not move around, and not come off while you walk. Discovering a problem at the hut, in the dark, with cold hands, is the worst moment.
The harness is essential because on the glacier you move as a rope team. We provide it if needed. If you have your own, bring it. It should be a low harness, classic for mountaineering or climbing. You do not need a full-body via ferrata harness.
Here too, the same rule applies: simple, suitable equipment, adjusted well.
Ice axe and poles: understanding when they are needed
The ice axe is an important mountain tool, but you also need to know how to use it.
On more demanding climbs, it is required. On more technical routes, on steeper slopes, on hard snow or wherever the guide considers it necessary, the ice axe is part of the correct equipment.
On some first experiences, such as the classic route to Capanna Margherita or Punta Giordani, it is not always required. This is a deliberate choice. These are more commonly travelled routes, without high technical difficulties compared with other Monte Rosa itineraries, and they are often the first glacier climbs for people approaching mountaineering. In these cases, if the guide judges that the terrain allows it, you may progress with telescopic poles and crampons, without adding a tool that the client still needs to learn how to use properly.
If, on the other hand, you know how to use an ice axe and you are taking on an itinerary where it makes sense to carry one, then you bring it.
Telescopic poles are very useful. Uphill, they help maintain rhythm and balance. Downhill, they reduce some strain on the knees and add stability. For those with little experience, an extra point of support makes the step more secure and less rigid. They help a lot, but they do not replace technique when the terrain requires crampons, rope travel and an ice axe.
Helmet, head torch and sleeping liner
The helmet is for safety. It can protect against impacts, small falling stones, ice or accidental knocks during progression. It should be used according to the guide’s instructions and according to the itinerary. On some routes it is central; on others the guide may assess differently. If it is required by the programme and you do not have one, it is provided.
A head torch must always be there. It is useful in the hut, for starts before dawn, in case of delays or if visibility changes. It must be charged, easy to find and not buried at the bottom of the rucksack. It is one of those things you hope to use very little, but when you need it, it must work immediately.
Sleeping liner: small, compulsory, respectful
A sleeping liner is required in mountain huts. It should be light and compact. A simple model is perfectly fine: the important thing is to have it with you and use it properly.
It helps you sleep better, respect hut rules and leave the place in good order for those who will sleep there after us. In the mountains, even these small gestures matter: they are part of the same way of being at altitude with attention, measure and respect.
We recommend a light, reusable sleeping liner, easy to wash and easy to pack back into the rucksack without taking up too much space. It is a simple, tidier and more sustainable choice than the disposable models sometimes found in huts. Here too, the same principle applies as with equipment: you do not need to complicate things, you need to choose something that works.
Flask, water and snacks
A flask or a one-litre water bottle is often a good balance. It allows you to drink during the climb without carrying excessive weight. If you know you drink a lot, you can consider taking more, remembering that every litre adds weight to the rucksack.
Arriving at the start already well hydrated helps. At altitude people often drink less than they should, and starting already dehydrated makes everything harder.
A hydration bladder can be useful in some situations, but in the cold it can freeze, especially in the tube. In high mountains, a simple flask is often the most reliable solution.
Snacks should be easy to eat even in the cold and with gloves on. Bars, dried fruit, small energy foods: simple things you know and digest well.
An orderly rucksack helps you think better
Your Monte Rosa rucksack does not need to be huge. It needs to be organised.
The things you may need during the climb must be easy to reach: warm gloves, shell, sunglasses, sun cream, snacks, water, head torch. Hut items can stay deeper inside. Delicate objects should be protected. Things you use often should not end up underneath everything else.
A well-packed rucksack saves time, energy and patience.
At altitude, that matters too.
The full list needs to be understood, not just ticked off
This is a complete reference list for a classic climb on Monte Rosa. It should always be adapted to the programme, the season, the conditions and the guide’s instructions.
Clothing
Technical breathable base layer.
Spare base layer.
Light fleece or equivalent light layer.
Warmer fleece or intermediate thermal layer.
Light or medium down jacket.
Windproof and waterproof shell.
Windproof mountaineering trousers.
Thermal leggings, especially for those who feel the cold or in cold conditions.
Two pairs of warm technical socks, especially for multi-day programmes.
Warm hat that covers the ears well.
Buff or neck warmer.
Two pairs of gloves: one light pair and one warmer pair.
Category 3 or 4 sunglasses.
Sun cream and lip protection.
Technical equipment
Ankle-high, waterproof, warm mountaineering boots with a stiff or semi-stiff sole.
Crampons compatible with the boots.
Low mountaineering or climbing harness.
Ice axe, when required.
Helmet, when required or indicated by the guide.
Telescopic poles.
Head torch.
Flask or water bottle of at least one litre.
Energy snacks.
Sleeping liner for the hut.
Gaiters, if useful according to boots, trousers and snow conditions.
This list helps you prepare. Then the climb asks for one more step: understanding what to use, when to use it and why.
The mountain changes during the day. Early in the morning it may be cold, then the sun arrives. The wind may pick up at altitude. The snow may be hard at first and softer on the descent. Your body may react differently from what you expected.
That is why equipment needs to be chosen carefully and used with a clear head.
Carrying everything without knowing where it is, when it is needed or how to use it only creates confusion. Packing your rucksack with care, testing your boots, checking your crampons, keeping gloves and shell accessible, knowing where your head torch is and drinking at the right time: these are simple, practical and very important things.
In high mountains, it is often the small, orderly details that make the difference.
Before leaving, take the time to read the list, test it, organise it and adapt it to you. If you have doubts, ask the guide or the Monterosa Booking team. It is better to clarify everything calmly at home than to discover at altitude that something is uncomfortable, unsuitable or difficult to use.
The list is a base. The choice is yours. Your head matters more.
To learn more about the role of mountain guides and professional training, you can also visit the official website of the Italian Mountain Guides.
Before you leave
If you are preparing for a climb on Monte Rosa and have doubts about your equipment, check the list calmly before departure. If something is not clear, write to us: it is better to solve a doubt at home than discover it in the hut, when the alarm is already set and the rope team needs to leave.
By the Monterosa Booking team, with contributions from the IFMGA mountain guides of Monte Rosa.